مراحل ساخت یک موتور ساده الکتریکی
مراحل ساخت یک موتور ساده الکتریکی
بدون شرح

و روش ديگر
به همين راحتي
متن به زبان اصلي
Building an Electric Motor
I do this more as an activity than anything else. I end up trying to cover electricity and magnetism in about two weeks, not anywhere near what is needed. I try to make the material relevant because it’s above most of the students in my conceptual physics classes. This is one of those activities where they amaze themselves.
I got the plans for an electric motor design from the book “Teaching Physics with Toys” by Taylor, Poth, & Portman. This book is really geared towards K-9, but I figure that if I find the activity cool, then why wouldn’t an 11th or 12th grader. I have the 1995 edition, they have a new edition that I haven’t seen. I don’t even know if this activity is in the new edition.
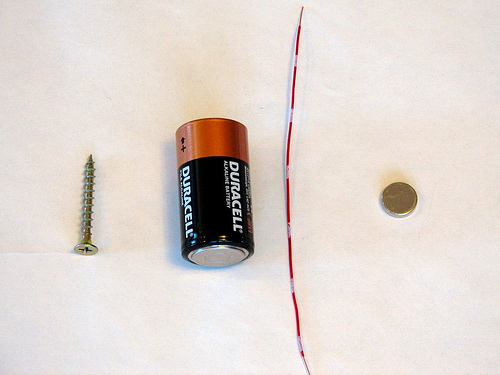
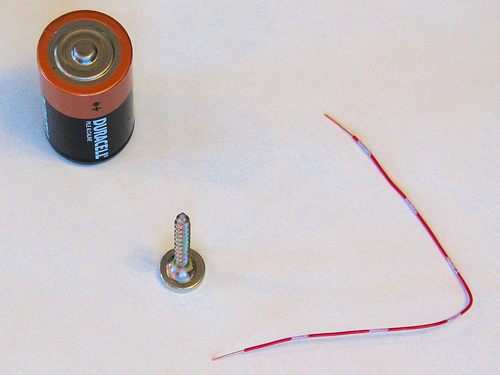
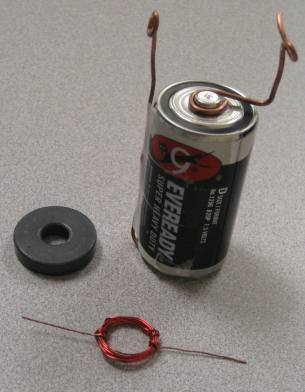
You can find similar activities on the web. (Build It: Electric Motor), but I like the design in the book better. Basically, you need a D cell, a doughnut magnet (available at Radio Shack), some bare heavy wire, like 14 or 16 gauge, some transformer or magnet wire (22-28 gauge), and a piece of sandpaper.
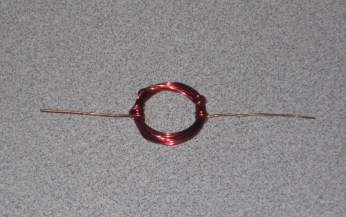
You take an arms length of the transformer wire, leave about 2 inches and wrap the rest around a dowel 5/8″ dowel or a white board marker, then leave another 2 inches at the other side.
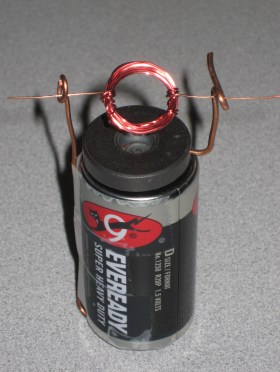
As you may be able to see from the picture to the left, the leads are wrapped around the coil to tie it all together. It is important to try to balance the coil so that the leads are along the centerline of the loop. Next, sand the ends of the magnet wire so that the red coating is gone and you can see bare copper.
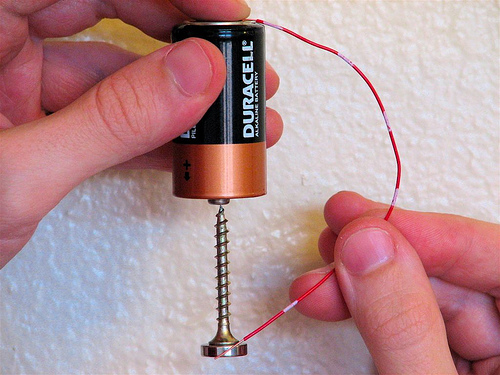
The magnet goes on top of the battery and will hold the top lead in place. You bring the negative voltage up with a bare copper wire, we use tape to hold the negative lead in place. Make a loop at the top of each with a pair of plyers. Try to make the loops on top at the same height so the motor doesn’t slide sideways.
To start the motor, just put it all together. You usually have to remove the positive lead to fit the winding coil into the loops. Put the leads back on and pop the magnet in place. If its really well made, the motor will begin spinning on its own. That rarely happens. Just give it a light spin. You will need to play with the leads to get them centered, but then when you get it right, it can run for hours.
منبع :
http://teachingphysics.wordpress.com
مطالب مشابه :
ساخت موتور حرارتی ساده
علم برتر-علوم تجربی دوره ی دبیرستان - ساخت موتور حرارتی ساده وقتی گازی (مثل هوا یا بخار)
ساخت ماشین بخار
خاطرات من - ساخت ماشین بخار - برای خودم ودلم می آیا بال های رو به جلو به عملکرد موتور کمک
ساخت موتور حرارتی ساده
تحقیق - ساخت موتور حرارتی ساده - تحقیق علوم - وقتی گازی (مثل هوا یا بخار)
مراحل ساخت یک موتور ساده الکتریکی
سرای فیزیک - مراحل ساخت یک موتور ساده الکتریکی - خدایا یاریم کن نگاهم در افق این فضای مجازی
ابداع ماشين بخار: قسمت اول(15 )
و با استفاده از آن، اولين موتور يا ماشين بخار در سال "تامس نيوکامن"، موتورهايی که او ساخت
برچسب :
ساخت موتور بخار